Those of you that actually read my blog will know that I did the C25K program last year. Of course I was terrible about updating so you don't really know the whole story. So here is the rest:
I did all of the weeks up to 5K. I ran in wind, rain, sleet and snow. I kept up with it every single day at lunch. I got pretty good. Ran one 5K run and then the s*** hit the fan!
Basically during that spring we were still commuting back and forth. The week that I completed the program we ended up getting our new house and things got crazy busy. I haven't run a step since then. Oddly it seems that we live closer to work, but have less time! I have been wanting to start again, but (and this is a horrendous excuse) I haven't been able to connect to the Internet at home very long and I need to re-download the pod-runner songs. Yup, I am awful!
But no more convenient excuses. I am going to start again, from week one this week. Tomorrow even...
I hope.
Anyways, among the other things that are going on that I need to update, I will add this. I might even move up to more than one post per week at this rate! I just have so much that I can talk about!
Tuesday, April 3, 2012
Wednesday, March 28, 2012
Winter Sowing
I read about winter sowing nearly a year ago and I was hooked. Seriously. Look into it. It will blow your mind.
Not sure where to go? Start here. This is by far the best information I have found to date.
Need a synopsis? Here it goes:
Winter sowing is planting seeds on or after the winter solstice and leaving them outside. They get rained on, snowed on, wind blown and chilled. This is especially beneficial for those plants that require scarification to germinate (think Peas). The end result should be seedlings that are used to temperature changes (no sissy greenhouse plants for us) and a higher success rate of germination and plant survival.
Making a winter sowing seedling container is easy. Take a milk jug or any liquid container, rinse it out and poke holes on the bottom. Cut almost all the way around the container about halfway up and fill with prepared potting soil. Plant your seeds, tape the container shut and label with a Laundry Marking pen. Leave the cap off and put the container outside where it can sit undisturbed and get a reasonable amount of sun.
Here is my "garden" Luckily I have a little balcony off of my craft room.

As you can see the sky is the limit as far as containers go. I do like the milk and beverage bottles the best, but the cookie and cake containers work well also. Just be sure to poke holes in the tops of them.
I am only growing vegetables so I didn't need to plant very early. We are also experiencing a strange warm winter here so I held off until the first weekend of March. Then I planted in a frenzy.
This morning I checked on my containers and I was delighted to find some seedlings making their appearances. Mostly the cold weather crops like lettuce, onions, broccoli, cauliflower and cabbage. Still, it gives me great hope to see that this is working!
Here are some pretty purple cauliflower plants:

And the broccoli:

Not sure where to go? Start here. This is by far the best information I have found to date.
Need a synopsis? Here it goes:
Winter sowing is planting seeds on or after the winter solstice and leaving them outside. They get rained on, snowed on, wind blown and chilled. This is especially beneficial for those plants that require scarification to germinate (think Peas). The end result should be seedlings that are used to temperature changes (no sissy greenhouse plants for us) and a higher success rate of germination and plant survival.
Making a winter sowing seedling container is easy. Take a milk jug or any liquid container, rinse it out and poke holes on the bottom. Cut almost all the way around the container about halfway up and fill with prepared potting soil. Plant your seeds, tape the container shut and label with a Laundry Marking pen. Leave the cap off and put the container outside where it can sit undisturbed and get a reasonable amount of sun.
Here is my "garden" Luckily I have a little balcony off of my craft room.

I am only growing vegetables so I didn't need to plant very early. We are also experiencing a strange warm winter here so I held off until the first weekend of March. Then I planted in a frenzy.
This morning I checked on my containers and I was delighted to find some seedlings making their appearances. Mostly the cold weather crops like lettuce, onions, broccoli, cauliflower and cabbage. Still, it gives me great hope to see that this is working!
Here are some pretty purple cauliflower plants:

Actually Purple! How fantastic!
And the broccoli:

Am I weird to think that baby plants are adorable?
Don't forget to check back because I am definitely documenting this entire journey!
Monday, March 19, 2012
Three Card Night
Well, a while ago I had some fun making cards for my friends. I had a small baby gift that I made to send to my Best Friend's sister, and gifts for my best friend and another friend that I have not seen in a while.
These gifts sat on the kitchen table for quite some time while I tried to find the inspiration that I needed to make cards for them. Finally, I sat down in front of Crikey (yes, my cricut is named "Crikey") and started cutting.

 Cute right? I thought so.
Next I made a card for her sister, my best friend. We only get to see each other about once a year. We talk frequently of course and trade hand made cards and gifts. She is the reason I got a Cricut in the first place. She had one, it was awesome, I had to have one too! I also cut the custom envelope and used my Xyron to make an owl sticker out of the envelope cutout because it turned out so cute!


It is just a one sided card. I flipped it over and wrote on the back. It is so cute though! This friend and I haven't seen each other in quite some time as we live across the country from one another, but I am glad I could make this farm girl card for her so that she knows I think about her and her family a lot.
I love that feeling when you sit in front of your cricut and the ideas just start flowing from you! I feel so productive and I get a lot of joy from making things for those that I love. We may not be close geographically but I really do have the best friends!
These gifts sat on the kitchen table for quite some time while I tried to find the inspiration that I needed to make cards for them. Finally, I sat down in front of Crikey (yes, my cricut is named "Crikey") and started cutting.
The first Card was for the new mommy to be. A simple card made from the "Just because cards" Cartridge.

Here is the gift that I sent with it. A luck bear crocheted pillow that I made.

Next I made a card for her sister, my best friend. We only get to see each other about once a year. We talk frequently of course and trade hand made cards and gifts. She is the reason I got a Cricut in the first place. She had one, it was awesome, I had to have one too! I also cut the custom envelope and used my Xyron to make an owl sticker out of the envelope cutout because it turned out so cute!

For this card I used the Sentimentals cartridge and some rich purple paper. I also used my ever diminishing scrap of gold vellum paper. Nice touch, no?

And since this was a three card night, I have one more. This one turned out so adorably that I even impressed myself. It was also the first time I got to use my Country Life cricut cartridge.

It is just a one sided card. I flipped it over and wrote on the back. It is so cute though! This friend and I haven't seen each other in quite some time as we live across the country from one another, but I am glad I could make this farm girl card for her so that she knows I think about her and her family a lot.
I love that feeling when you sit in front of your cricut and the ideas just start flowing from you! I feel so productive and I get a lot of joy from making things for those that I love. We may not be close geographically but I really do have the best friends!
Thursday, February 23, 2012
Sweet Storage!
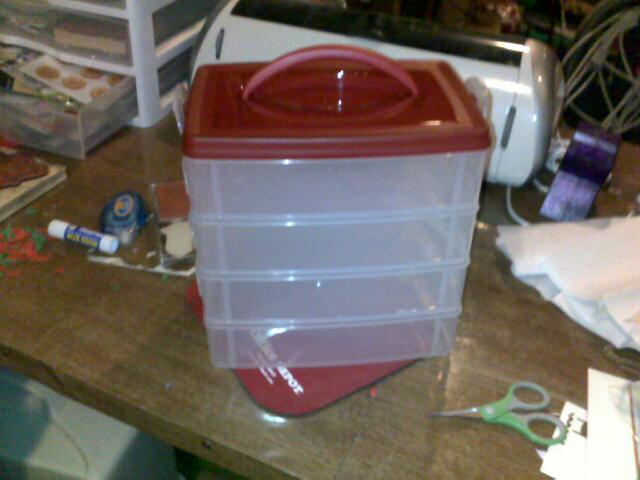
After Christmas is a magical time of year. The sales are bountiful and with careful planning one may pick up items for the next Christmas season rather cheaply. This year I was especially lucky. I found this Christmas-y storage box and I knew I had to have it.

As you can see, the contents of my craft space are strewn willy nilly about a badly dented table...and I am thankful that is all you can see! But, I knew that this box would help. I could keep stamps and loose Cricut cartridges and other supplies in it all while keeping them visible and easy to find. Not to mention this new storage could open up space in my paper drawers so that I could consolidate the stacks. Yay!
So, I quickly loaded everything up into my snazzy new box.

And it all lay in rather nicely don't you agree? Cricut Cartridges and overlays in one section, clear stamp sheets in another, small clear stamps in yet another and the last housed perfectly my mounted and unmounted rubber stamps.
My first thought? "I don't have enough stamps!" It is true. Ineed want more stamps...
My second thought? "Crap! I should have bought more of these boxes!"

How perfect is this? I can think of so many more things to use it for:
As you can see, the contents of my craft space are strewn willy nilly about a badly dented table...and I am thankful that is all you can see! But, I knew that this box would help. I could keep stamps and loose Cricut cartridges and other supplies in it all while keeping them visible and easy to find. Not to mention this new storage could open up space in my paper drawers so that I could consolidate the stacks. Yay!
So, I quickly loaded everything up into my snazzy new box.

And it all lay in rather nicely don't you agree? Cricut Cartridges and overlays in one section, clear stamp sheets in another, small clear stamps in yet another and the last housed perfectly my mounted and unmounted rubber stamps.
My first thought? "I don't have enough stamps!" It is true. I
My second thought? "Crap! I should have bought more of these boxes!"

How perfect is this? I can think of so many more things to use it for:
- Crochet/Knitting supplies
- ink pads
- more stamps of course
- glues, pens, paints and other art/craft accountrements
- animal grooming supplies/extra hardware
- brining homemade cheeses
- makeup
- hair accessories
- cleaned and de-haired raw fiber (I am thinking cashmere)
- milking and other supplies (gloves, filters, etc) for dairy goats...
Wednesday, February 15, 2012
Valenversary Present (Mostly a picture post)
Look what I got for my Valenversary?

Are you jealous? I am so excited I am halfway jealous of myself!
And in a fit of pure glee, I used my crikey to make it mine!

My big Bay is named Dreamer, and his registered name is Heza Dreamachine, so I named my new favorite and long awaited kitchen appliance after him.
I used the "Old West" cartridge and cut the letters out at 2 inches. I cut the horse out at 3 inches.

OMG, I love it so much! Thank goodness for Cricut, and sticky craft vinyl.
And thank goodness for my DB who very clearly loves me and wants me to be happy.
And to cook for him.
Happy Valenversary...or How to make a cake using your Cricut Expression
So my DB and I have the pain pleasure of celebrating our anniversary on Valentines day. So, we lovingly call this holiday our "Valenversary." Every year I try to make sickeningly sweet treats and sappy gifts.
Hey! It is my Valenversary after all!
On another note (it's related, I promise!), I have been wanting a Cricut Cake since I knew they existed. I have the expression and I use it fairly regularly so I don't want to ruin it to make cake things. But Last week I hatched an idea...
I could use my regular old Cricut to cut images out and then I could use those images to trace out fondant. I was so excited. I went and bought Fondant, cake mix and an Xacto knife. I knew just the cake to bake for this.
I have one of those Checkerboard cake kits and I have NEVER been able to make it work. I can't ever get the cake mixes to pour in evenly and they come out sloppy and sad. Everyone seems to love the "marbled cake," but it makes me sad inside because I know the true failure.
Then BAM! Another idea hit me...and it was a great one! I could use ziplock baggies to pipe the batter in. I am the smartest gal alive! Ahem.
So here we go with the fun pictures taken by my horrid camera phone in my kitchen that happens to have bad lighting. Can lights are artsy, but they are not good for seeing things...seriously!
And we start this project off with a mistake right away. I used a package of Duncan Hines Red Velvet cake and a package of Betty Crocker Vanilla Cake that I dyed pink. Yes, I used Wilton gel dye...I love that stuff!

This is only a mistake because I have learned that half of my problem with the cake I am making is that I use 2 different mixes. Next time I am using 2 of the same mix, colored differently. I WILL make this work!
Now, I set my gallon sized Ziplock baggies up in a large container and poured batter in. Also, in a rare moment of clarity, I greased all 3 cake pans AND floured them. I tend to get excited about cake so I rush and forget that part. Ugly cake tastes good, but it is still ugly cake. I also set up some paper towels to put my bags of batter on when I wasn't using them...so totally prepared and proud.!

I got everything set up and snipped the end off of the bags and began to pipe.
And here is what they looked like when I was done:

Awesome right???? I thought so at least.
So I baked the cakes until a butter knife came out clean and brought them put to cool. So far they were looking OK, though I began to worry about the mixes that had mostly red velvet. Notice how the red velvet seems to have taken over?

Well, I used my handy dandy cake leveling device to level each sheet and then I used some frosting to glue them together. This is all after I let the cakes cool completely of course.

See, now that the tops are cut off the red velvet layers look like only red velvet. Not fun. But turning out cute. What did I do with the scraps? Stay tuned, no cake is thrown away in my house!
I let the cake chill over night and I brought it out to put the crumb layer on. This I was most certainly NOT happy with. How do people get such a clean crumb layer? Mine was just so...so crumby.

I am personally blaming this crumb catastrophe on the frosting. Maybe if I actually took the time to make butter cream it would be cleaner. Or maybe it was the cake mix. I will most certainly be trying this again!
Moving on though, the cake got covered and put back into the fridge. Then I raced upstairs and cut some images from card stock. I used Heritage, Old West, Mickey and Friends and Jasmine. Of course, I left my phone downstairs so those didn't make it in the gallery. But I will do my best to give specs when I can.
When I had everything gathered, I rolled out my base layer of fondant and covered the cake. I should have put a little more research into this because it ended up pretty wrinkled and icky...but maybe not a bad first try.

You can see the shapes in the background! YAY.
I had some fondant left over, so I decided to dye it red with my Wilton gel. Didn't work. It was a very lovely bright pink though, so I cut the basic shapes out of that.
I rolled the fondant out, and laid down the shape I wanted then traced around it with the Xacto knife. After I had cut my shapes, I still had fondant left, so I added purple food coloring to it for the lettering. The lettering was hard to get right. I used Jasmine and cut out the "I Love You" phrase at 3 inches. The cuts were clean, but the lettering is wispy so it was difficult to not tear it. The horses were also a little more challenging. Next time I will roll fondant and chill it so that it doesn't pull so much. Other than that, not bad. What do you think?

It started to look very "I love Lucy" but then the "You" plopped lop-sidedly onto the cake and the purple stained the white so I had to leave it where it was. Again, the lettering was "Jasmine" cut at 3 inches. The heart was from "Mickey and Friends" and I cut that out at 5 inches.

Here is one of the horses (cut at 3 inches from "Old West"). See the fondant wrinkle? ARGH!

And here is a truck that I cut at 3 inches from "Heritage." Isn't this cool? It is actually my favorite of the shapes I cut.
All in all I used 2 truck cut outs and 2 horse cut outs to go around the cake. I chose these shapes so that the cake represented both of our interests. Well, the main interests at any rate.
I did not take a picture of the inside of the cake. It didn't work! The red velvet seems to be less dense than the vanilla and most of it sort of rose to the top while baking. So, again I am going to use 2 boxes of the same cake next time and see if that works any better. If not, then this darned checkerboard kit is got to goodwill! No reason for it to take up precious pantry space if I can't get the bugger to work.
Overall I still want a cricut cake, but I feel good knowing that I can manage with my sweet little regular Cricut.
Thursday, February 9, 2012
Holli
As might be glaringly apparent, I have a bit of an obsession with horses. Just a bit. OK, it might actually be bordering on major...so I will get this over with before I continue:
Hi. My name is Lacy and I am a Horse-a-holic.
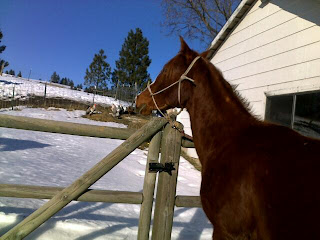
Well I feel better, how about you? Anyhow, all of this hullabaloo to work up to telling you that I got a new horse. I found this 2 year old AQHA filly on that Magical list that Craig set forth and because she was pretty cheap, and had great breeding, I went to see her.
Well, when this walked from behind the barn:

I was a little disappointed. As I worked with her, however I began to see potential that you may see as well. Her head is hidden under a mass of winter hair, but the lines are good. Her neck is a little thin and she has this annoying tendency to periscope, but she is 2, her neck is actually low slung and some work will muscle it right up.
When I concentrated from the shoulder back, I really loved what I saw. She is balanced, leggy and tall. Her legs are straight, hooves are appropriately sized and shaped considering she has had approximately nothing done to them.
Some things that I really loved which you cannot see in this picture are her softness and attitude. She hasn't been handled much, especially in the last year yet she allowed us to halter her, and she went an extra mile to avoid pressure. Like, this is a REALLY soft horse. I try to stay away from the word sensitive because that tends to mean "insane" and she is not that. Actually very level headed.
She is also just ever so slightly witchy.
This may cause people to wonder why I said that I liked her attitude. I really do. I love a horse that has a personality. And I feel that training these horses is a little easier because they tell you what is wrong instead of blowing up all of a sudden. I found her witchiness by touching her back leg after her owner told me that she hasn't worked with her hindquarters at all. Holli kicked out and I spanked her. It was like reaching an agreement.
Holli: "Back off, I don't like that."
Me: "I don't care and you are not allowed to kick me."
Holli: "fine."
And that was literally all that was said about that. She allowed me to touch her all over, and move her this way and that. So, I bought her.
Look at these cute buns!

When I went to pick her up I was concerned about her getting into my 2 horse straight load trailer. I needn't have worried. I led her in and got out through the exit door No problem. She rode nicely along with my Bay gelding who is TERRIBLE in the trailer. I saw her pinning her ears in his direction a few times, no doubt calling him names that would get her grounded, but nothing else.
When we got home it was dark, and I had to park on a slope. Our driveway is covered in a crusty layer of snowy ice so it was a little slick. This is where we had a problem. She started to back out nicely, her foot touched the slippery ground and she was back in like a shot. It took me about 5 minutes to convince her that it was OK to get out, but she finally did and I put her away.
No drama. Such a good girl.
So the next day I decided to pull it together and groom the ever loving daylights out of her. She had mud crusted everywhere and a badly tangled mane and tail. So the very first thing I did was pre-treat her with WD40. Yup, the blue and yellow can found in the automotive section. Hands down my favorite for manes and tails and any hard to get mud clumps when it is too cold to bathe.
After a solid grooming this is what I had:

Cute mare! Then came time to dance with the clippers.... Really this wasn't a problem. She didn't pull back though she really didn't like the clippers. She made it clear to me that she was unsure but I kept talking to her and I got it done.

And miraculously her coarse head became rather nice. She would not let me do her ears, so I didn't push the issue. We have plenty of time to get that done, I didn't want to do too much anyways.
Doesn't she almost look Arabian in this picture?
And here is one of her giving me her "what the hack am I still doing here" face.

All in all, I am very happy with her. We will start working on some things soon. I will start out showing her Halter and hopefully be able to advance her through some baby classes this summer. She will be turning 3 in May, so I think that would be the perfect time to start her.
By the way, you may or may not be aware of our familial forelock handicap (as in we seem to end up with horses that have crappy forelocks) but have you noticed that she may break that record?

Such a cutie :)
Hi. My name is Lacy and I am a Horse-a-holic.
Well I feel better, how about you? Anyhow, all of this hullabaloo to work up to telling you that I got a new horse. I found this 2 year old AQHA filly on that Magical list that Craig set forth and because she was pretty cheap, and had great breeding, I went to see her.
Well, when this walked from behind the barn:

I was a little disappointed. As I worked with her, however I began to see potential that you may see as well. Her head is hidden under a mass of winter hair, but the lines are good. Her neck is a little thin and she has this annoying tendency to periscope, but she is 2, her neck is actually low slung and some work will muscle it right up.
When I concentrated from the shoulder back, I really loved what I saw. She is balanced, leggy and tall. Her legs are straight, hooves are appropriately sized and shaped considering she has had approximately nothing done to them.
Some things that I really loved which you cannot see in this picture are her softness and attitude. She hasn't been handled much, especially in the last year yet she allowed us to halter her, and she went an extra mile to avoid pressure. Like, this is a REALLY soft horse. I try to stay away from the word sensitive because that tends to mean "insane" and she is not that. Actually very level headed.
She is also just ever so slightly witchy.
This may cause people to wonder why I said that I liked her attitude. I really do. I love a horse that has a personality. And I feel that training these horses is a little easier because they tell you what is wrong instead of blowing up all of a sudden. I found her witchiness by touching her back leg after her owner told me that she hasn't worked with her hindquarters at all. Holli kicked out and I spanked her. It was like reaching an agreement.
Holli: "Back off, I don't like that."
Me: "I don't care and you are not allowed to kick me."
Holli: "fine."
And that was literally all that was said about that. She allowed me to touch her all over, and move her this way and that. So, I bought her.
Look at these cute buns!

When I went to pick her up I was concerned about her getting into my 2 horse straight load trailer. I needn't have worried. I led her in and got out through the exit door No problem. She rode nicely along with my Bay gelding who is TERRIBLE in the trailer. I saw her pinning her ears in his direction a few times, no doubt calling him names that would get her grounded, but nothing else.
When we got home it was dark, and I had to park on a slope. Our driveway is covered in a crusty layer of snowy ice so it was a little slick. This is where we had a problem. She started to back out nicely, her foot touched the slippery ground and she was back in like a shot. It took me about 5 minutes to convince her that it was OK to get out, but she finally did and I put her away.
No drama. Such a good girl.
So the next day I decided to pull it together and groom the ever loving daylights out of her. She had mud crusted everywhere and a badly tangled mane and tail. So the very first thing I did was pre-treat her with WD40. Yup, the blue and yellow can found in the automotive section. Hands down my favorite for manes and tails and any hard to get mud clumps when it is too cold to bathe.
After a solid grooming this is what I had:

Cute mare! Then came time to dance with the clippers.... Really this wasn't a problem. She didn't pull back though she really didn't like the clippers. She made it clear to me that she was unsure but I kept talking to her and I got it done.

And miraculously her coarse head became rather nice. She would not let me do her ears, so I didn't push the issue. We have plenty of time to get that done, I didn't want to do too much anyways.
Doesn't she almost look Arabian in this picture?

And here is one of her giving me her "what the hack am I still doing here" face.

All in all, I am very happy with her. We will start working on some things soon. I will start out showing her Halter and hopefully be able to advance her through some baby classes this summer. She will be turning 3 in May, so I think that would be the perfect time to start her.
By the way, you may or may not be aware of our familial forelock handicap (as in we seem to end up with horses that have crappy forelocks) but have you noticed that she may break that record?

Such a cutie :)
Wednesday, February 1, 2012
Etched Wine Glass Tutorial
I always try to make very personal gifts for my friends. This means that few of them actually get their gifts in time as I start the project when inspiration comes. It also means that friends I have a particular challenge with friends I have had for a long time. I am constantly trying to one up myself and come up with the next coolest idea.
I have one friend that absolutely adores hats and slippers that I make, and the last several years have alternated between being a "hat year," or a "slipper year." I thought that she had quite enough of both to last her for a while, but then panicked because no new ideas were forthcoming. Then it dawned on me: personalized wine glasses.
This particular friend enjoys a nice relaxing glass of wine in the evenings and has some nice stemware, but I pounced on the opportunity to give her something cute and functional. Earlier in the year I had purchased supplies to do some embossing and supplies for etching glass. Add those to my Cricut, and I had everything I needed.
One of the tips I read about etching glass is to choose images that aren't too complicated. My friend is into horses like I am, so I chose a nice simple, but pretty running horse stamp for the image. Then I used my Old West cartridge to cut her name out of sticky vinyl, and I cut some straight edges to outline the area.
This is what they looked like when prepared:

I feel like I should take this time to note that stamping on curved glass (or any glass) is not as easy as it may seem. The image kept becoming either blurry because it would slip around, or it would not all be stamped. I cleaned the glasses off and started over about 40 times. Finally, I took the block off of the stamp (I was using an unmounted rubber stamp), got it nice and inky and curved it around the glass. The 41st time was the charm. Then I was able to apply the embossing powder, and had to blow it away gently as it sort of clung to the glass in some places. Still, I got it to work and used my heat gun to finish the job.

Then I applied the etching cream and went about my other business so I wouldn't stare at it and try to clean it off too soon. This was another tip I learned online about etching: they tell you to let it sit for 10 minutes, but that is never enough. Of course, if you let it go too long it will start to eat the edge of your vinyl and embossing and your lines won't be as clean.

I left it for about 40 minutes. It did start to eat at the letters a little, so maybe next time I would clean it off after 30 minutes.

They actually turned out so cute! Not perfect, but I think that even adds a little to their charm.
Next time I will only let the cream set for 30 minutes, and I will cut letters out from a different cartridge. I was going for the rope letters look from the rope font on Old West, but I don't think it translated. That is actually the only part I have a problem with: the lettering looks a bit more sloppy than rope-like.
Subscribe to:
Posts (Atom)