Thursday, June 29, 2017

Jeannie

Several hundred (read: seven) years ago, right after I graduated from the University of Idaho, I lived in Weippe. Never heard of it? Don't worry, it is basically Nowheresville, Idaho. Right where the panhandle starts, hidden in the woods, on a prairie, on the top of the world, 2 hours from anywhere and just like heaven. My parents live there, and I found an opportunity to rent the house, shop, garage, barn and 5 acres right behind them.

Seriously guys, it was so amazing! However it did have a certain drawback. Remember how I said that it is 2 hours from anywhere? Well that includes from the place that I worked. Try as I might, I just could NOT land a job closer to "home." I drove 2 hours, each way for 13 months. As a matter of fact, I am pretty sure I mentioned that here...

Anyhoozles.

While I lived there, my closest neighbor was an elderly man named Gene. He was quite the character. As a matter of fact, when fall was coming on, I noticed that my mom was coming over during the day and taking blankets off of the horses. Sweet. But, one day when I remembered to thank her, she said "Oh! That wasn't me! I thought you were doing that."

Huh.

So, after I had gone to work one day, mom decided to ask the old man next door who always seemed to be sitting on his porch. She figured he would see what was happening, and fill her in.

"Yap. I took them blankets off. I was walkin' by and they asked me to." He said matter of factly.

"Well, next time they ask, tell them no because they don't have long enough hair yet," my mom deadpanned back to him.

This guy was an honest to goodness horse lover, and I am positive my horses did ask him for something. It was probably treats, but they happily stand to have their blankets pulled off so that they can feel the wind on their butts.

Gene had a horse too. An extra large, stunning AQHA bay mare. He called her Pretty Girl, and when Gene wasn't on his porch, he was out with Pretty Girl, petting her and talking to her about how beautiful she was and how much he loved her. I am telling you guys: Gene was a genuinely kind and loving person and he gave every ounce of devotion to his horse. As far as I knew, the mare wasn't broke to ride, I never saw a halter on her and she never left the property, but she was so loving and kind because of the gentle treatment that she had received for her entire life.

He had bought her from a ranch in northern Montana as a 2 year old. He got her, and a 2 horse slant trailer, hauled her home and she became an over sized puppy dog, and the trailer, full of brand new tack was never used again.

I moved away and life took me in many different directions after that, but I drove by to see her every time I visited my parents and I waved at old Gene, who would solemnly lift his hand and nod.

In the summer of 2016, however Gene passed away. My first question was: "where is Pretty Girl?"

She was still at Gene's and seemed to be getting fed, so we weren't terribly concerned, but we did know that Gene didn't have any children, so my mom did some investigating. She located the person who was handling the estate, and found out that everything was for sale, and they weren't sure what to do with the 16 year old, presumably unbroke mare. She said that my mom or I could have her if we were willing to give her a forever home.

Now, we can all pretty much agree that at any given point in time, I need another horse like I need a new hole in my head. But, I can't seem to help myself. I was bringing another mare to my parent's house so that I could wean her baby and I decided that, if Pretty Girl would get into the trailer, she could come home with me.

This was going to be a short trip, just over night because I had a friend come with me and we had to be back in town to go to work on Monday. On Saturday, we loaded up my mare, and set off for Weippe. When we got there, and got Ruby unloaded we immediately ran over to Gene's old place to see if we could even handle Pretty Girl.

The moment I got into the pasture, I knew that I would be willing to put in a lot of blood sweat and tears to make this work. Pretty Girl greeted us, and took treats and let us snuggle her. I slipped the halter onto her and led her around. She seemed very grateful for the attention, and her completely passive and loving life had made her into a sweet, willing horse. No guile, no vices, no problems.

The next day, we pulled my trailer over there and set everything up to minimize stress. I got her halter on and walked her to the trailer and began feeding her treats. After a few minutes, we put hay in the trailer, and poured grain on top and she jumped right in. Just to be sure she was okay, we unloaded her and then loaded her again a few times. This mare was a saint. She hadn't been in a horse trailer in 14 years! But, she had also never ever been mishandled or even pushed, so she had every reason to trust us completely. I fell madly in love with her then and there.

After a brief snafu on the way home that led to us being stranded at a gas station for a few hours while we waited for my mom to come rescue us, we got her home and we decided to call her Jeannie in homage to Gene.

I have had Jeannie for about 10 months now and she is more amazing every day. She loves to cuddle and will happily sleep in your lap all day.


She is also basically broke. I am not sure if she was trained before Gene picked her up, or if she is just so sweet that she will let you do whatever you want to her, but it all amounts to the same thing:


Jeannie is a keeper!

Monday, July 25, 2016

Chopped

I have always had very long hair. This isn't really because I like the way it looks in particular, but because I am too lazy cheap busy to go and get it cut. As a matter of fact, the last time I had a hair cut was July of 2015, when I put all of my hair into a ponytail and cut some of it off. That didn't really work as planned but two weeks later, my hair had this nice, long layered look about it.

Before that? October 2013. When you cut your hair as infrequently as I do, it is pretty easy to remember when, where and how the deed was done.

Fast forward to now: my hair is about butt length and it is approximately 477,715 degrees Fahrenheit here in southern Idaho. Not only do I want to cut my hair, I pretty much want to shave my head.

A few weeks ago, I started playing with this makeover ap, and it allows you to try out different hairstyles. Because I am also too cheap lazy busy to worry about makeup most of the time, I was having a grand time fixing myself up and I stumbled across this hairstyle:


Wowza! I look somewhat AMAZING with super duper short hair! Also, I love the very dark color.

I showed the picture (somewhat bashfully) to my good friend Malina, who had the same reaction that I did. She is also smarter than I am and suggested that we try some of the hairstyles on her SO just to make sure that it wasn't just a trick of the ap to make you look good in everything.

We got a picture of him modeling one of her necklaces (authenticity is of the utmost importance to us) and gave him the most FABULOUS makeover. Ever. The verdict? It wasn't the ap. I really did look good with that style.

I also worked some magic on Kevin:


Have mercy (He was less impressed than I was).

I decided at that point that I wanted to cut my hair. And then the excuses began to flood in. My face is too fat to pull off short hair. My hair is really fine (although there is a TON of it) so it won't look like that. I don't know where to get my hair cut. I don't want to get my hair colored, but that picture is of darker hair. And on and on.

At some point, I got sick of my own excuses. Hair grows. Mine in particular grows very fast. If I hate the hairstyle, then I can grow it out. No big deal.

So, I began doing my homework. I googled pixie cuts. And saw a lot of women who looked like fairy princesses with their tiny faces and darling hairdos. Realistic? Not for me! I finally googled "fat girl pixie cut" and found a plethora of different styles and different faces. And, do you know what? They all looked good. I even found several blogs and articles that basically all said that you should just go for it.

Now to find someone who could/would do it. I found out from Malina that one of our co-workers has a daughter in Beauty School, so I called up and booked an appointment with her. I had decided that I was going to do it, and there is no changing my mind.

Well, I did have to bring support along with me (Malina), and my "Fat girl pixie cut" Google search, but I did it. They asked me a few times if I would like to cut it in stages, but I was adamant that they braid it and lob it all off. That way I can donate my longish braid, and also I can't turn back.

The whole process took over 2 hours because, while my hair has fine individual strands, there is A LOT of it. I mean, really a lot. Also, because I have had longish to aggressively long hair my entire life (minus that time that I was bald because I was a baby), my hair would start to take advantage of its new relationship with gravity and stick straight up, requiring many interventions with a squirt bottle. Calm yourself hair, it will be fine.

After many hours of deliberation, and then actually taking the plunge, this is what I ended up with:


And I am in love with my hair. Learning to style it has been a challenge. I mainly just work with my "forelock" and let the rest dry on its own through the day because I STILL do not own a hair dryer. Still. Also, I am learning to be OK with bangs. Mainly with the fact that they completely cover my eyes if I don't cement them down. I don't know if it is something that I will change at my next appointment, or if I will be warmed up to them by then. Currently I am just giving it a good old college try.

Some days my hair surprises me and is super easy to style and stays put. Then, there are the other days during which, it looks like I rubbed raw bacon on it to keep it in place, and it still won't stay. On those days, I use a bobby pin to hold it together. No sense in fighting a losing battle. My hair has always had a mind of its own, and I have learned that it is best to let it do its thing.

Some things that I LOVE about this hairstyle are:

  1. Heavy hair related headaches are a thing of the past. 
  2. My riding helmet fits so much better
  3. So does my baseball cap
  4. And my Cowboy hat
  5. And All the hats
  6. Look at that picture...somehow my double chin WENT AWAY. Like, it ran away and hid, folks! I am aware that it still exists, but we don't have to remind it to say "cheese" for pictures anymore because my hair is no longer framing my face.
  7. My ears aren't quite as Dumbo as I thought they were
  8. Damn! Whose fantastically sharp jawline is that? 
  9. When I lay down, I don't have to artfully arrange my hair, or worry about a ponytail or bun stabbing me.
  10. I pretty much never sit on my hair anymore
  11. Neither does my husband
  12. The blissful feeling of freedom! 
Some things I don't love:
  1. The forelock is a bone of contention, because it is so long
  2. Yoga: While my hair isn't generally in the way anymore, I do have to clip back the 'lock.
  3. OK, so I have to clip back the 'lock when I do pretty much anything active 
  4. My hair is fairly brown, but bleaches out in the sun. They cut off all of my blonde highlights. This isn't necessarily a bad thing though, because I do like it dark. 
Still nervous about changing your hair? DO IT! Just do it. Seriously, you will not only look much better than you think you will, but everyone for the rest of forever will talk about how brave and awesome you are. This may or may not be real, but it makes you feel brave and awesome, and that carries over!

I don't know if I will have pixie short hair forever, but I am no longer afraid to try something new. I am thrilled with my new sense of boldness and I can't wait to see where it carries me. I really do feel like "I cut off a lot of my hair, so I can do anything!"


Tuesday, June 28, 2016

Where the hell have you been?

Everywhere. I have been through so many changes since my last post, that it has been somewhat overwhelming to think of what to post next. I even debated dissolving this blog and starting over but decided against it.

Why would I do that? Well, not to get overly sentimental about completely meaningless things (spoiler: that is what I am doing), but I feel like the erratic and random posts that were already here are a part of me and that I should acknowledge them.

So, back on task. Where have I been since April of 2012? Well, you might be sorry that you wondered, but here is the synapses:

May 2012: I moved to a new place near Lewiston, and I got a new Job working as an assistant manager at Ross.

March 2013: Got promoted to store manager with Ross.

April 2014: Broke up with boyfriend of 5 years, moved to Boise area to allow me to attend Nursing school and build a life around my farming and horse habits. Got a job at Lowes.

July 2014: Began dating someone from work. Just casual. After 5 years, I needed some "me" time.

August 2014: Got a second job at Caption Call. Super fun job everyone! Also, stopped working at Lowes because the manager refused to work around my CC schedule but refused to give me more that 12 hours a week.

October 2014: "Casual" relationship is not as casual as I had intended. Kevin (boyfriend status at this point) took me on a surprise trip. To Las Vegas. To see Wicked. "I love you," happened. How could you not??

December 2014: Started working as a book keeper/Scheduler for an in home care company. Dropped CC. Kevin moved in.

April 2015: Kevin proposed on Easter. so much for "casual," and "taking it slow." No, I'm not pregnant, and that is an issue for another post.

June 2015: Got a Job at a Wells Fargo call center (just thinking about it makes me seriously want to throat punch someone). Married Kevin. Le sigh. I never thought I was capable of loving another human being as much as I love him!

September 2015: Get a job with St Lukes Hospital; give Wells Fargo the finger (not that they care).

And not much has changed since then. I have moved 3 times since I met Kevin (twice with him), and we are now in a place that we can hopefully hang on to for a few years while we build credit to buy a place of our own. Some stability would be nice.

Also, did you notice anything that didn't happen in there? You probably didn't, but here it is: Nursing School. I did take classes. There were some I had to re-do (they got somewhat crabby about me trying to use my Veterinary Anatomy and Physiology classes on my application), but for the most part it ended up being too much. I had maxed out my student loans (cries, silently) and could not afford to do any more undergraduate work. However, I am finally working in the medical field and I love it. I am just front office at this point, checking patients in and out, but it is a great job and I am happy to do the work!

And here we are. I did a lot of fast forwarding over personal dramas that were interspersed, and I may not update on many of those as some of them are private, and most of them, no one really cares about. It has been an eventful few years for me and looking back has really made it clear to me just how much things can change in a short span of time. So, if things aren't going so great, just hang on for a little while. Circumstances will change. Also, if things are just fantastic right now, then take some time to appreciate the good times for what they are!


Tuesday, April 3, 2012

C25K...again

Those of you that actually read my blog will know that I did the C25K program last year. Of course I was terrible about updating so you don't really know the whole story. So here is the rest:

I did all of the weeks up to 5K. I ran in wind, rain, sleet and snow. I kept up with it every single day at lunch. I got pretty good. Ran one 5K run and then the s*** hit the fan!

Basically during that spring we were still commuting back and forth. The week that I completed the program we ended up getting our new house and things got crazy busy. I haven't run a step since then. Oddly it seems that we live closer to work, but have less time! I have been wanting to start again, but (and this is a horrendous excuse) I haven't been able to connect to the Internet at home very long and I need to re-download the pod-runner songs. Yup, I am awful!

But no more convenient excuses. I am going to start again, from week one this week. Tomorrow even...

I hope.

Anyways, among the other things that are going on that I need to update, I will add this. I might even move up to more than one post per week at this rate! I just have so much that I can talk about!

Wednesday, March 28, 2012

Winter Sowing

I read about winter sowing nearly a year ago and I was hooked. Seriously. Look into it. It will blow your mind.

Not sure where to go? Start here. This is by far the best information I have found to date.

Need a synopsis? Here it goes:

Winter sowing is planting seeds on or after the winter solstice and leaving them outside. They get rained on, snowed on, wind blown and chilled. This is especially beneficial for those plants that require scarification to germinate (think Peas). The end result should be seedlings that are used to temperature changes (no sissy greenhouse plants for us) and a higher success rate of germination and plant survival.

Making a winter sowing seedling container is easy. Take a milk jug or any liquid container, rinse it out and poke holes on the bottom. Cut almost all the way around the container about halfway up and fill with prepared potting soil. Plant your seeds, tape the container shut and label with a Laundry Marking pen. Leave the cap off and put the container outside where it can sit undisturbed and get a reasonable amount of sun.

Here is my "garden" Luckily I have a little balcony off of my craft room.


As you can see the sky is the limit as far as containers go. I do like the milk and beverage bottles the best, but the cookie and cake containers work well also. Just be sure to poke holes in the tops of them.

I am only growing vegetables so I didn't need to plant very early. We are also experiencing a strange warm winter here so I held off until the first weekend of March. Then I planted in a frenzy.

This morning I checked on my containers and I was delighted to find some seedlings making their appearances. Mostly the cold weather crops like lettuce, onions, broccoli, cauliflower and cabbage. Still, it gives me great hope to see that this is working!

Here are some pretty purple cauliflower plants:


Actually Purple! How fantastic!

And the broccoli:


Am I weird to think that baby plants are adorable?

Don't forget to check back because I am definitely documenting this entire journey! 

Monday, March 19, 2012

Three Card Night

Well, a while ago I had some fun making cards for my friends. I had a small baby gift that I made to send to my Best Friend's sister, and gifts for my best friend and another friend that I have not seen in a while.

These gifts sat on the kitchen table for quite some time while I tried to find the inspiration that I needed to make cards for them. Finally, I sat down in front of Crikey (yes, my cricut is named "Crikey") and started cutting.

The first Card was for the new mommy to be.  A simple card made from the "Just because cards" Cartridge.


Here is the gift that I sent with it. A luck bear crocheted pillow that I made.

Cute right? I thought so.

Next I made a card for her sister, my best friend. We only get to see each other about once a year. We talk frequently of course and trade hand made cards and gifts. She is the reason I got a Cricut in the first place. She had one, it was awesome, I had to have one too! I also cut the custom envelope and used my Xyron to make an owl sticker out of the envelope cutout because it turned out so cute!


For this card I used the Sentimentals cartridge and some rich purple paper. I also used my ever diminishing scrap of gold vellum paper. Nice touch, no?


And since this was a three card night, I have one more. This one turned out so adorably that I even impressed myself. It was also the first time I got to use my Country Life cricut cartridge.


It is just a one sided card. I flipped it over and wrote on the back. It is so cute though! This friend and I haven't seen each other in quite some time as we live across the country from one another, but I am glad I could make this farm girl card for her so that she knows I think about her and her family a lot.

I love that feeling when you sit in front of your cricut and the ideas just start flowing from you! I feel so productive and I get a lot of joy from making things for those that I love. We may not be close geographically but I really do have the best friends!


Thursday, February 23, 2012

Sweet Storage!

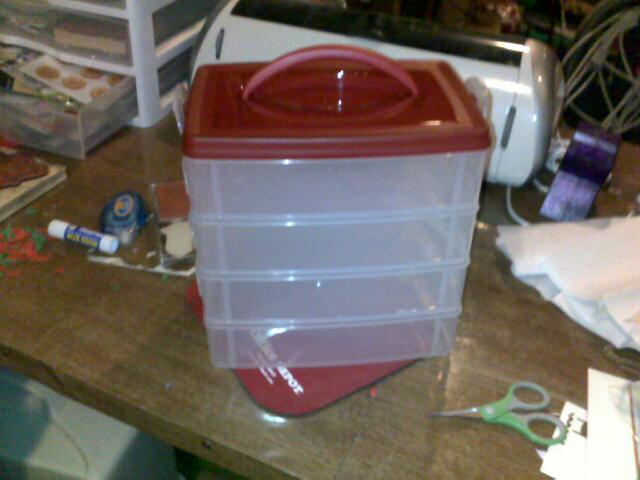
After Christmas is a magical time of year. The sales are bountiful and with careful planning one may pick up items for the next Christmas season rather cheaply. This year I was especially lucky. I found this Christmas-y storage box and I knew I had to have it.


As you can see, the contents of my craft space are strewn willy nilly about a badly dented table...and I am thankful that is all you can see! But, I knew that this box would help. I could keep stamps and loose Cricut cartridges and other supplies in it all while keeping them visible and easy to find. Not to mention this new storage could open up space in my paper drawers so that I could consolidate the stacks. Yay!

So, I quickly loaded everything up into my snazzy new box.


And it all lay in rather nicely don't you agree? Cricut Cartridges and overlays in one section, clear stamp sheets in another, small clear stamps in yet another and the last housed perfectly my mounted and unmounted rubber stamps.

My first thought? "I don't have enough stamps!" It is true. I need want more stamps...

My second thought? "Crap! I should have bought more of these boxes!"


How perfect is this? I can think of so many more things to use it for:

  • Crochet/Knitting supplies
  • ink pads
  • more stamps of course
  • glues, pens, paints and other art/craft accountrements
  • animal grooming supplies/extra hardware
  • brining homemade cheeses
  • makeup
  • hair accessories
  • cleaned and de-haired raw fiber (I am thinking cashmere)
  • milking and other supplies (gloves, filters, etc) for dairy goats...
And the possibilities are endless. Unfortunately I went back the next day to find my special little boxes sold out. I have a hawk-eye out though for them though every time I go into the store. If they are ever available again I WILL buy more of them...lots more.

Wednesday, February 15, 2012

Valenversary Present (Mostly a picture post)

Look what I got for my Valenversary?


Are you jealous? I am so excited I am halfway jealous of myself!

And in a fit of pure glee, I used my crikey to make it mine!


My big Bay is named Dreamer, and his registered name is Heza Dreamachine, so I named my new favorite and long awaited kitchen appliance after him.

I used the "Old West" cartridge and cut the letters out at 2 inches. I cut the horse out at 3 inches.


OMG, I love it so much! Thank goodness for Cricut, and sticky craft vinyl.

And thank goodness for my DB who very clearly loves me and wants me to be happy.

And to cook for him.

Happy Valenversary...or How to make a cake using your Cricut Expression

So my DB and I have the pain pleasure of celebrating our anniversary on Valentines day. So, we lovingly call this holiday our "Valenversary." Every year I try to make sickeningly sweet treats and sappy gifts.

Hey! It is my Valenversary after all!

On another note (it's related, I promise!), I have been wanting a Cricut Cake since I knew they existed. I have the expression and I use it fairly regularly so I don't want to ruin it to make cake things. But Last week I hatched an idea...

I could use my regular old Cricut to cut images out and then I could use those images to trace out fondant. I was so excited. I went and bought Fondant, cake mix and an Xacto knife. I knew just the cake to bake for this.

I have one of those Checkerboard cake kits and I have NEVER been able to make it work. I can't ever get the cake mixes to pour in evenly and they come out sloppy and sad. Everyone seems to love the "marbled cake," but it makes me sad inside because I know the true failure.

Then BAM! Another idea hit me...and it was a great one! I could use ziplock baggies to pipe the batter in. I am the smartest gal alive! Ahem.

So here we go with the fun pictures taken by my horrid camera phone in my kitchen that happens to have bad lighting. Can lights are artsy, but they are not good for seeing things...seriously!

And we start this project off with a mistake right away. I used a package of Duncan Hines Red Velvet cake and a package of Betty Crocker Vanilla Cake that I dyed pink. Yes, I used Wilton gel dye...I love that stuff!


This is only a mistake because I have learned that half of my problem with the cake I am making is that I use 2 different mixes. Next time I am using 2 of the same mix, colored differently. I WILL make this work!


Now, I set my gallon sized Ziplock baggies up in a large container and poured batter in. Also, in a rare moment of clarity, I greased all 3 cake pans AND floured them. I tend to get excited about cake so I rush and forget that part. Ugly cake tastes good, but it is still ugly cake. I also set up some paper towels to put my bags of batter on when I wasn't using them...so totally prepared and proud.!


I got everything set up and snipped the end off of the bags and began to pipe.


And here is what they looked like when I was done:


Awesome right???? I thought so at least.

So I baked the cakes until a butter knife came out clean and brought them put to cool. So far they were looking OK, though I began to worry about the mixes that had mostly red velvet. Notice how the red velvet seems to have taken over?


Well, I used my handy dandy cake leveling device to level each sheet and then I used some frosting to glue them together. This is all after I let the cakes cool completely of course.


See, now that the tops are cut off the red velvet layers look like only red velvet. Not fun. But turning out cute. What did I do with the scraps? Stay tuned, no cake is thrown away in my house!

I let the cake chill over night and I brought it out to put the crumb layer on. This I was most certainly NOT happy with. How do people get such a clean crumb layer? Mine was just so...so crumby.


I am personally blaming this crumb catastrophe on the frosting. Maybe if I actually took the time to make butter cream it would be cleaner. Or maybe it was the cake mix. I will most certainly be trying this again!

Moving on though, the cake got covered and put back into the fridge. Then I raced upstairs and cut some images from card stock. I used Heritage, Old West, Mickey and Friends and Jasmine. Of course, I left my phone downstairs so those didn't make it in the gallery. But I will do my best to give specs when I can.

When I had everything gathered, I rolled out my base layer of fondant and covered the cake. I should have put a little more research into this because it ended up pretty wrinkled and icky...but maybe not a bad first try.


You can see the shapes in the background! YAY.

I had some fondant left over, so I decided to dye it red with my Wilton gel. Didn't work. It was a very lovely bright pink though, so I cut the basic shapes out of that.

I rolled the fondant out, and laid down the shape I wanted then traced around it with the Xacto knife. After I had cut my shapes, I still had fondant left, so I added purple food coloring to it for the lettering. The lettering was hard to get right. I used Jasmine and cut out the "I Love You" phrase at 3 inches. The cuts were clean, but the lettering is wispy so it was difficult to not tear it. The horses were also a little more challenging. Next time I will roll fondant and chill it so that it doesn't pull so much. Other than that, not bad. What do you think?


It started to look very "I love Lucy" but then the "You" plopped lop-sidedly onto the cake and the purple stained the white so I had to leave it where it was. Again, the lettering was "Jasmine" cut at 3 inches. The heart was from "Mickey and Friends" and I cut that out at 5 inches.


Here is one of the horses (cut at 3 inches from "Old West"). See the fondant wrinkle? ARGH!


And here is a truck that I cut at 3 inches from "Heritage." Isn't this cool? It is actually my favorite of the shapes I cut.


All in all I used 2 truck cut outs and 2 horse cut outs to go around the cake. I chose these shapes so that the cake represented both of our interests. Well, the main interests at any rate.

I did not take a picture of the inside of the cake. It didn't work! The red velvet seems to be less dense than the vanilla and most of it sort of rose to the top while baking. So, again I am going to use 2 boxes of the same cake next time and see if that works any better. If not, then this darned checkerboard kit is got to goodwill! No reason for it to take up precious pantry space if I can't get the bugger to work.

Overall I still want a cricut cake, but I feel good knowing that I can manage with my sweet little regular Cricut.

Thursday, February 9, 2012

Holli

As might be glaringly apparent, I have a bit of an obsession with horses. Just a bit. OK, it might actually be bordering on major...so I will get this over with before I continue:

Hi. My name is Lacy and I am a Horse-a-holic.

Well I feel better, how about you? Anyhow, all of this hullabaloo to work up to telling you that I got a new horse. I found this 2 year old AQHA filly on that Magical list that Craig set forth and because she was pretty cheap, and had great breeding, I went to see her.

Well, when this walked from behind the barn:


I was a little disappointed. As I worked with her, however I began to see potential that you may see as well. Her head is hidden under a mass of winter hair, but the lines are good. Her neck is a little thin and she has this annoying tendency to periscope, but she is 2, her neck is actually low slung and some work will muscle it right up.

When I concentrated from the shoulder back, I really loved what I saw. She is balanced, leggy and tall. Her legs are straight, hooves are appropriately sized and shaped considering she has had approximately nothing done to them.

Some things that I really loved which you cannot see in this picture are her softness and attitude. She hasn't been handled much, especially in the last year yet she allowed us to halter her, and she went an extra mile to avoid pressure. Like, this is a REALLY soft horse. I try to stay away from the word sensitive because that tends to mean "insane" and she is not that. Actually very level headed.

She is also just ever so slightly witchy.

This may cause people to wonder why I said that I liked her attitude. I really do. I love a horse that has a personality. And I feel that training these horses is a little easier because they tell you what is wrong instead of blowing up all of a sudden. I found her witchiness by touching her back leg after her owner told me that she hasn't worked with her hindquarters at all. Holli kicked out and I spanked her. It was like reaching an agreement.

Holli: "Back off, I don't like that."

Me: "I don't care and you are not allowed to kick me."

Holli: "fine."

And that was literally all that was said about that. She allowed me to touch her all over, and move her this way and that. So, I bought her.

Look at these cute buns!


When I went to pick her up I was concerned about her getting into my 2 horse straight load trailer. I needn't have worried. I led her in and got out through the exit door No problem. She rode nicely along with my Bay gelding who is TERRIBLE in the trailer. I saw her pinning her ears in his direction a few times, no doubt calling him names that would get her grounded, but nothing else.

When we got home it was dark, and I had to park on a slope. Our driveway is covered in a crusty layer of snowy ice so it was a little slick. This is where we had a problem. She started to back out nicely, her foot touched the slippery ground and she was back in like a shot. It took me about 5 minutes to convince her that it was OK to get out, but she finally did and I put her away.

No drama. Such a good girl.

So the next day I decided to pull it together and groom the ever loving daylights out of her. She had mud crusted everywhere and a badly tangled mane and tail. So the very first thing I did was pre-treat her with WD40. Yup, the blue and yellow can found in the automotive section. Hands down my favorite for manes and tails and any hard to get mud clumps when it is too cold to bathe.

After a solid grooming this is what I had:


Cute mare! Then came time to dance with the clippers.... Really this wasn't a problem. She didn't pull back though she really didn't like the clippers. She made it clear to me that she was unsure but I kept talking to her and I got it done.


And miraculously her coarse head became rather nice. She would not let me do her ears, so I didn't push the issue. We have plenty of time to get that done, I didn't want to do too much anyways.

Doesn't she almost look Arabian in this picture?


And here is one of her giving me her "what the hack am I still doing here" face.


All in all, I am very happy with her. We will start working on some things soon. I will start out showing her Halter and hopefully be able to advance her through some baby classes this summer. She will be turning 3 in May, so I think that would be the perfect time to start her.

By the way, you may or may not be aware of our familial forelock handicap (as in we seem to end up with horses that have crappy forelocks) but have you noticed that she may break that record?


Such a cutie :)

Wednesday, February 1, 2012

Etched Wine Glass Tutorial

I always try to make very personal gifts for my friends. This means that few of them actually get their gifts in time as I start the project when inspiration comes. It also means that friends I have a particular challenge with friends I have had for a long time. I am constantly trying to one up myself and come up with the next coolest idea.

I have one friend that absolutely adores hats and slippers that I make, and the last several years have alternated between being a "hat year," or a "slipper year." I thought that she had quite enough of both to last her for a while, but then panicked because no new ideas were forthcoming. Then it dawned on me: personalized wine glasses.

This particular friend enjoys a nice relaxing glass of wine in the evenings and has some nice stemware, but I pounced on the opportunity to give her something cute and functional. Earlier in the year I had purchased supplies to do some embossing and supplies for etching glass. Add those to my Cricut, and I had everything I needed.

One of the tips I read about etching glass is to choose images that aren't too complicated. My friend is into horses like I am, so I chose a nice simple, but pretty running horse stamp for the image. Then I used my Old West cartridge to cut her name out of sticky vinyl, and I cut some straight edges to outline the area.

This is what they looked like when prepared:


I feel like I should take this time to note that stamping on curved glass (or any glass) is not as easy as it may seem. The image kept becoming either blurry because it would slip around, or it would not all be stamped. I cleaned the glasses off and started over about 40 times. Finally, I took the block off of the stamp (I was using an unmounted rubber stamp), got it nice and inky and curved it around the glass. The 41st time was the charm. Then I was able to apply the embossing powder, and had to blow it away gently as it sort of clung to the glass in some places. Still, I got it to work and used my heat gun to finish the job.


Then I applied the etching cream and went about my other business so I wouldn't stare at it and try to clean it off too soon. This was another tip I learned online about etching: they tell you to let it sit for 10 minutes, but that is never enough. Of course, if you let it go too long it will start to eat the edge of your vinyl and embossing and your lines won't be as clean.


I left it for about 40 minutes. It did start to eat at the letters a little, so maybe next time I would clean it off after 30 minutes.


They actually turned out so cute! Not perfect, but I think that even adds a little to their charm.

Next time I will only let the cream set for 30 minutes, and I will cut letters out from a different cartridge. I was going for the rope letters look from the rope font on Old West, but I don't think it translated. That is actually the only part I have a problem with: the lettering looks a bit more sloppy than rope-like.

Tuesday, December 27, 2011

Like Yoga for Horses

*Note: I am leaning forward...ARGH! But at least the horse looks good. Working on a 10 meter circle.


It never fails to make me laugh. Inevitably when someone finds out that I ride and train both English and Western horses, they ask: "do you do dressage?"

The answer is: always.

Then another statement from this new person: "I have always wanted to do dressage, I wonder if my horse could do it."

This single statement is probably the dumbest thing I have ever heard (no offense to those of you who wonder...keep reading). It is like wondering if you can do yoga. Any person can do at least a little yoga, and will benefit from it. This is the same with horses. Can you drink water? should you breathe air? These are all similar questions.

Yes, your horse CAN do dressage. You can do it too, and the sooner that you start, the better your life and the life of your horse will be. Here are some reasons to do dressage:

*It will improve balance and posture in your horse

*It will improve your balance and Posture (you see, dressage is like yoga for people too)

*It will strengthen the effectiveness of horse/rider communication

*A responsive horse is more likely to find a good home if (God forbid) you should ever need to re-home it.

*Dressage increases muscle tone and overall fitness in both horse and rider.

*It will make your reining horse stronger and more efficient, and ultimately able to do a prettier pattern

*It will develop the back muscles needed in cutting and quick cow work

*It will develop all muscles needed for jumping

*It will create a pretty rounded and natural look for your western or english pleasure horse.

*or any show horse

*rhythmic exercises are soothing for high strung horses

*extension and flexion exercises are wonderful for lazy horses

*Dull horses learn to respond

*hyper-sensitive horses learn to wait for cues

*Riders learn to be patient, relax and rejoice in small victories (you would be surprised at how many small victories are in a day...it leads to a much more satisfied life)

*Dressage, unlike any other equine sport, focuses on the longevity of the horse. A lot of the Prix St Georges horses are in their late teens and early twenties and much more fit than a 10 year old show horse. Their usable life is extended and their quality of life is improved.

*Older horses tend to lose muscle tone first, creating that "ridge back" effect. Slow dressage workouts help build that muscle back and keep your horse looking well.

Here are some reasons not to do dressage:

*

*

OK, I can't think of one! There is no reason not to do it. If you have a stick horse or no horse at all, at the very least, learning dressage terminology and "riding" a pattern in your living room will improve memory and muscle memory. It feels silly, but my friends and I use to do tests on foot just to commit them to memory. Don't be ashamed!

Now, I know that not every horse is Prix St Georges material, some of them may never make it past training level, but that isn't what is important here. The "tricks" of high School dressage are amazing, but that shouldn't be your goal. When you start, your goal is to improve the life of you and your horse.

Honestly, this seems counter intuitive, but Training level and lower levels are the hardest. Do you remember how hard Kindergarten was? I do, coloring inside the lines seemed purposeless and why would I learn to read or add when mommy and daddy do it for me? But, when you get going and really start learning, school would get easier and easier. Sure, we hit roadblocks in each grade and it became hard, but kindergarten had taught us to learn, take instruction and the value and fun of knowledge.

Your horse will go through the same process. If you have never done any dressage he will question and maybe even get frustrated from time to time. you will feel like your kindergarten teacher did. It might frustrate you too, but just remember to have patience. He is upset because he doesn't know the answer. Try to find ways to make it easier for him to FIND the answer. Don't give it to him. And don't ever try to force him.

Here is a very basic dressage exercise that will help you both learn. Your horse will learn to seek the correct answer and you will learn patience. Some of you may already do this. Without knowing it, you are doing dressage!

First a few tips: I ride with my inside leg up by the girth, and my outside leg just slightly back. This helps cue my horse as to my intentions. It is a good thing to ALWAYS make your intentions clear. If I am out in a random field or on a trail and I ask for a canter or lope from the walk, they know which lead to take based on my leg position. It is OK to do this without head and neck flexion. That will come with time. Don't expect this to be perfect! Have patience and your horse will learn more quickly than you think. Also, I always start these exercises with loose-ish reins. don't try to fight for control, but don't throw the horse away either. A plain snaffle bit, or rubber mouth snaffle is perfect. But you can do this in a halter, bitless, whatever. The instructions are for riding with two hands though so I recommend a mild snaffle or bitless affair.

OK, here it goes:

You will start this exercise at the walk. A field, hill, center of the arena, any where you can do a circle. Start out on a 5 meter circle. Now don't go panicking already 5 meters is about 15 feet across. Just a moderate circle in the center of your workspace is fine. Get a good consistent walk. If all you do during the first lesson is learn how to walk on a 5 meter circle then no big deal. Small victories are big victories in the long run. If your horse is really having a hard time walking on a small circle, then spiral out until he is comfortable. We can reverse this exercise to build enough muscle to handle a 5 meter circle.

Once the horse has a very consistent cadence, not quite plodding, but not rushing either, increase the pressure from the inside leg at the girth. HEELS DOWN!!!! Just use the side of your calf to press against the area just behind the girth. At the same time release pressure from your outside leg. If your horse is confused, take your outside leg completely off of him...point it out, whatever. What you are doing is asking him to move sideways and forward at the same time. Your hands/reins do not change and your seat does not change. If he is still having trouble, increase the weight on your inside seat bone, but don't lean. Think of it as closing the door for any inside movement and opening the outside door. When the horse takes ONE STEP in the direction (sideways and still forward) RELEASE!

The release is the most important part. This is the reward for the horse. If he does it and you keep asking, he thinks he has given the wrong answer. So, when he even makes the slightest try at first release to let him know he is doing well. You will be surprised at how quickly he learns. Pet him, tell him how good he is and try again. The next time, if your release was correct, he will respond much more quickly. Once he responds well, add steps. Keep increasing the size of your circle until you can't anymore or until you feel that he is doing well on that side.

DO NOT QUIT HERE. It is vitally important that you train both the left and right sides of your horse. Do this exercise in both directions. If you are only working on a good circle, do it in both directions. Always, always, always work both directions!

Another very important thing to keep in mind is not to overdo it. This can be as bad as expecting too much, and is very closely related to that. This may seem so simple and easy, but it is building muscle, and thought in you and your horse. When you first start only work a maximum of 15 minutes in each direction. Work your way up to longer sessions, then add trot and canter (or jog and lope for you western gurus) when you are ready. More importantly don't add these before the horse is ready. He will get sore, and become less and less compliant and maybe even bored. I am not saying to limit your entire ride to 30 minutes total, but the gymnastic dressage sessions should start out with that. Remember, dedicate equal time to both sides. One side may need more work than the other but you will find that out when you start. that's OK. As long as the horse learns the same exercise on both sides you are golden.

Don't forget to warm up and cool down. a nice walk and trot on loose reins to start, and a good walk after you are done. This should be one where you aren't trying to teach him something. Let him walk and think. Prepare and cool down from each lesson. It is good for you too; I promise!

I know that this may sound so hard for those of you just starting out. The key is to have patience. With yourself as well as your horse. It is hard for a lot of people to learn to separate their leg movements, but you can learn how. After all, you learned how to walk, and it was hard, but you did it. You can do this too. Sometimes it helps to explain the goals and process to someone who does not ride and ask them to critique you. I get so frustrated sometimes when my non-horsey boyfriend tells me to sit up straight, but then I have to remember, he is looking at me with only the knowledge that I have given him. The correct way to do it, and he can process that and recognize that I am not being correct. It helps that he doesn't know what I am doing. Even when I am bunched up trying to get a colt to understand my legs and an experienced horse person might overlook that and not mention it, DB just sees me not sitting up straight and calls me on it.

Tuesday, December 20, 2011

Presents for co-workers (another tutorial...Woot!)

I am so excited about this method! I found the original idea here. I have to say on a side note that I am totally addicted to Tip Junkie. There are lots of great ideas over there!

Anyhow, I work with horsey people (lucky me) so I found some horse head cookie cutters in which to make the fudge. Here is the recipe:

1 1/2 Cups Semisweet chocolate chips
1 Cup Peanut Butter Chips
1 14oz can sweetened condensed milk
2 tbs butter or margarine
1 tsp Vanilla extract

The original recipe says to mix the chips and milk and butter and microwave for 2 minutes stirring every 30 seconds.

YOu can do that if you want, but I think that the microwave was meant to be a time saver...so if I have to babysit it I don't want to play; I may as well cook over the stove. Which is what I did.

I set up my pyrex bowl on a shallow pot with water in it. Insta-double boiler.


I mixed the chips, milk and softened butter together and turned it on. You do have to stir it to make sure it heats evenly, but it smells so yummy, and the results are worth the time spent in front of the stove.


While the chips were melting I prepared the cookie cutters. I placed each one on a square of foil and wrapped. I had to get creative in the tight corners, but I figured out a system. Then I sprayed each one with cooking spray. I would take regular breaks throughout this process to stir my chips.


With all six cookie cutters prepared and my chips really starting to melt, I concentrated on stirring at this point. When the mixture was almost all the way melted and combined I mixed in the vanilla. Then let it get pretty melty. Once it was at a loose fudge consistency, I scooped it into each cookie cutter. I used a big table spoon (like really, a table spoon used at the table...)and I got about 3 scoops into each cookie cutter. I smoothed the mixture out as much as possible, then I covered the whole cookie sheet and put it out to chill. I have a handy dandy front room/porch thing that works as a cold room during the winter. Great for when I am doing Holiday baking.

While the cutters were cooling, I put a tub of leftover royal icing that I had from assembling my gingerbread house into the still hot but not boiling water in the pan. Then I cleaned up a little. Made some dip for the office party. Played with the dogs. Washed my hands.

After about a half hour, the royal icing was soft enough to use so I packed it into an icing bag with a medium small tip. I am sorry that I can't be more specific but I got a set of decorating tips and there is a tiny one, a medium small one and a bigger one...I used the one that was most medium. I put manes anf forelocks on all of the horses. Peter thought that they should have smiles but I didn't want to get too cheesey so I just added mouths. I think they turned out really cute!


And a close up. What a pretty chocolate palomino...har har.


I covered them and put them back out into the cold room to chill overnight. Then I headed upstairs and set up Crikey (that is the name of my Cricut machine for those of you just tuning in). I loaded my Winter Woodland Cartridge and selected the card feature, then the horse. I set it at 1 1/2 inches and cut. I used contrasting paper and shift+card+horse to get the background.


This morning I peeled the tinfoil off of each cutter, and wiped away the excess cooking spray. Then I put them into individual baggies and tied the gift tags to them.


So cute! I love the way they turned out, and I think that this would work with any cookie cutter. I tested one of them and the fudge would slide out easily, even though the cookie cutters I used were somewhat complicated. I think I am going to do a lot more of these. I got the cutters off of ebay in a big lot (9 total)so I might get more of different varieties to send friends and family. These are small so they would be cheap to ship and still let everyone know that you are thinking of them.

A word of warning, each fudge piece is about 700 calories. Not to put a damper on your excitement, but I thought that I should be up front about the drawbacks. I don't think that I could even eat a whole one though...the fudge is very rich as I found out from licking the spoon after I had finished filling the cutters.

Friday, December 16, 2011

I did it! (my first tutorial...sort of)

I finally cut fabric with my cricut using the freezer paper method. The last time I tried it was an epic fail. Fabric didn't want to stick to paper, then the blade just messed it up (as in frayed the fabric). So I canned the idea. There aren't really any tutorials out there for this method anyway...maybe it can't be done.

Au Contraire mon fraire!

Last night, for some reason, I just decided to do it. I took some zoo fabric that I have had for years because I don't know what to do with it (pretty standard cheap quilting cotton) and I ironed it to freezer paper. Basically you match the shiney side of the paper to the wrong side of the fabric and iron with a very hot, dry iron. I ironed the crap out of it and made sure that the fabric was indeed stuck down. It didn't stick very well around the edges, and the freezer paper peels off easily so I just made sure that a good portion of it was reasonably fused.

For this cut, my storybook cartridge was already loaded. The most simple design on that cartridge is the flower shadow (shift+shadow+I)so I decided to use that one. I loaded the mat and moved the blade to the point where the fabric and paper were really fused. Here is the technical stuff:

Blade pressure: 5

Size: 3 inches (personal choice...but I think too small or too detailed would fail)

Speed: Min (this is really important!

Multi-cut: I didn't actually use multi cut for this project, but I am going to try next time. there was one spot I had to finish cutting by hand.

Once it was cut out, I just peeled the paper off of the fabric and it is a clean, plain piece of fabric.

And here it is:


Sort of a modest little flower. but she has a special place right now as my first fabric piece cut from cricut.

Are you waiting for the irony? I can't remember why it was so important for me to learn to cut fabric this way. I have seen the multitudes of heat and bond success and every project I can think of (quilts, applique, etc) would be appropriate for that method. I do remember having a strong desire to learn to cut fabric with cricut sans anything permanent on the back...

Whatever. I can do it, and it is done. As soon as I remember why this was important, I will know that I can.

This has also bred a desire for adventure. I have so many ideas: felt story board, fleece. but I didin't know where to start. Last night I fused a small piece of fleece in between two pieces of freezer paper. I couldn't find my deep cut blade but as soon as I do I will try it. Hopefully it will work and I can share it with you here!